Category Archives: Recipe Posts

Savory Elegance: Pork Chops with Mushroom Cream Sauce

Pork Chops with Mushroom Cream Sauce

Introduction:

Tomahawk pork chops are a culinary masterpiece, known for their impressive presentation and incredible flavor. When paired with a velvety mushroom cream sauce, they transform into an extraordinary dish that’s perfect for special occasions or when you want to treat yourself to something truly exceptional.

Ingredients:

For the Tomahawk Pork Chops:

– 2 Tomahawk pork chops
Olive oil
– Salt and freshly ground black pepper
– Fresh rosemary and thyme sprigs

For the Mushroom Cream Sauce:

– 2 cups of sliced mushrooms (your choice of variety)
– 2 cloves of garlic, minced
– 1 shallot, finely chopped
– 1 cup of heavy cream
– 1/2 cup of chicken or vegetable broth
– 2 tablespoons of butter
Salt and pepper to taste
– Chopped fresh parsley for garnish

Instructions:

For the Tomahawk Pork Chops:

1. Preheat the Oven:
– Preheat your oven to 400°F (200°C). Allow it to reach the desired temperature while you prepare the pork chops.

2. Season the Pork Chops:
– Brush the tomahawk pork chops with olive oil, then generously season them with salt and freshly ground black pepper. Ensure both sides are well coated.

3. Sear the Pork Chops:
– Then, heat an oven-safe skillet over medium-high heat. Once hot, sear the pork chops on each side for about 2-3 minutes until they develop a golden-brown crust.

4. Add Aromatic Herbs:
– Toss a few sprigs of fresh rosemary and thyme into the skillet for added aroma. These herbs will infuse their flavors into the pork as it cooks.

5. Transfer to the Oven:
– Place the skillet with the seared pork chops in the preheated oven. Roast for approximately 20-25 minutes or until the internal temperature reaches 145°F (63°C).

For the Mushroom Cream Sauce:

6. Make the Mushroom Cream Sauce:
– In a separate skillet, melt the butter over medium heat. Add the chopped shallots and minced garlic. Sauté until they become translucent and fragrant.

7. Add Mushrooms:
– Add the sliced mushrooms to the skillet and cook until they release their moisture and become tender. Season with salt and pepper to taste.

8. Introduce Cream and Broth:
– Pour in the heavy cream and chicken or vegetable broth. Allow the mixture to simmer gently, stirring occasionally, until it thickens to your desired consistency.

9. Plate and Garnish:
– Place the cooked tomahawk pork chops on serving plates. Pour the luscious mushroom cream sauce over them, allowing it to cascade down the sides.
– Lastly, garnish with freshly chopped parsley for a burst of color and freshness.

10. Serve and Savor:
– Your Tomahawk Pork Chops with Mushroom Cream Sauce is finally ready to delight your taste buds. Enjoy this elegant dish with your favorite side dishes or a glass of fine wine.

Conclusion:

Tomahawk pork chops with mushroom cream sauce is a culinary journey that combines simplicity with sophistication. The robust flavor of the pork chops, enhanced by the earthy richness of the mushroom cream sauce, makes for an unforgettable dining experience. Whether for a special celebration or a luxurious evening at home, this dish promises to impress.

Cooking Jumbo Lobster Tails: Tips, Techniques, and Recipes

Jumbo lobster tails are the epitome of oceanic luxury, promising succulent, sweet meat that’s a gourmet delight. Cooking these colossal crustacean tails may seem intimidating, but fear not. In this guide, we’ll uncover the secrets to preparing restaurant-worthy lobster tails in your own kitchen.

Selecting the Perfect Lobster Tails

Before diving into cooking techniques, it’s crucial to start with the right lobster tails. Here’s what to look for:

1. Size Matters: Opt for jumbo lobster tails, typically 8-12 ounces, ensuring ample meat for your dish.

2. Freshness is Key: Seek out fresh or frozen lobster tails, as quality is paramount for flavor.

3. Shell Color: Vibrant red shells are a sign of a well-fed lobster, indicating delicious, tender meat.

4. Avoid Preservatives: If buying frozen, select tails without additives or preservatives for pure lobster flavor.

Cooking Methods

There are various ways to cook jumbo lobster tails, each offering a unique flavor and texture profile. Let’s explore the top methods:

1. Broiling

  • Prep: Split the tails in half lengthwise and season with butter, herbs, and spices.
  • Technique: Place tails on a broiler pan and cook under high heat for 7-10 minutes.
  • Result: Crispy, golden tops with tender, succulent meat.

2. Grilling

  • Prep: Split the tails, brush with garlic butter, and grill shell-side down for 5-7 minutes.
  • Technique: Grill over medium-high heat, achieving smoky, charred flavors.
  • Result: A delightful smokiness that enhances lobster’s natural sweetness.

3. Baking

  • Prep: Butterfly the tails, season with breadcrumbs, garlic, and Parmesan.
  • Technique: Bake in a preheated oven at 425°F for 12-15 minutes.
  • Result: A delectable, cheesy crust atop tender lobster meat.

4. Steaming

  • Prep: Place split tails on a steaming rack, drizzle with lemon juice, and steam for 8-10 minutes.
  • Technique: Steaming preserves lobster’s delicate taste and tenderness.
  • Result: Moist, succulent lobster tails with a clean, natural flavor.

5. Sous Vide

  • Prep: Vacuum-seal lobster tails with butter, herbs, and spices.
  • Technique: Sous vide at 135°F for 30-45 minutes for precise doneness.
  • Result: Perfectly cooked lobster, evenly tender from edge to center.

Serving Suggestions

Enhance your lobster tail experience with these serving ideas:

1. Classic Butter Dipping Sauce

  • Melted butter with garlic, lemon, and fresh herbs elevates lobster’s natural sweetness.

2. Citrus and Herb Relish

  • A zesty blend of citrus segments, fresh herbs, and olive oil adds vibrancy to your dish.

3. Creamy Lobster Risotto

  • Pair lobster tails with a rich, creamy risotto for a decadent, restaurant-quality meal.

4. Lobster Tail Tacos

  • Create a fusion dish by serving lobster tails in soft tortillas with avocado, salsa, and lime crema.

5. Lobster Tail Scampi

  • Sauté lobster tails in garlic, white wine, and butter for a delectable scampi-style preparation.

Cooking jumbo lobster tails is an art that can turn any meal into a special occasion. Whether you prefer the smokiness of grilling, the elegance of baking, or the precision of sous vide, the key lies in selecting quality lobster tails and choosing the method that suits your taste. With the right techniques and a bit of culinary flair, you can savor the taste of luxury right at home. Bon appétit!

Hokkaido Scallop Ceviche

If you’re craving a burst of oceanic flavors combined with zesty citrus notes, Hokkaido Scallop Ceviche is your answer. This exquisite dish offers a tantalizing blend of fresh Hokkaido scallops, vibrant herbs, and tangy citrus juices. In this blog post, we’ll share a step-by-step recipe for Hokkaido Scallop Ceviche and explore the best ways to serve it.

Hokkaido Scallop Ceviche Recipe

Ingredients:

  • 1 lb fresh Hokkaido scallops, thawed if frozen
  • 3-4 limes, juiced (about 1 cup of lime juice)
  • 1 small red onion, finely diced
  • 1-2 jalapeño peppers, seeds removed and finely chopped (adjust to taste)
  • 1/2 cup fresh cilantro, chopped
  • 1/2 cup fresh cherry tomatoes, quartered
  • 1/2 cup cucumber, diced
  • 1/2 teaspoon salt, or to taste
  • Freshly ground black pepper, to taste
  • 1-2 tablespoons extra-virgin olive oil
  • Avocado slices for garnish (optional)
  • Tortilla chips or crackers for serving

Instructions:

  1. Prepare the Hokkaido Scallops:

    • Rinse the Hokkaido scallops thoroughly under cold running water to remove any sand or impurities.
    • Pat them dry gently with paper towels.
  2. Slice the Scallops:

    • Slice the scallops horizontally into thin rounds, about 1/4 inch thick. Place the sliced scallops in a mixing bowl.
  3. Lime Juice Bath:

    • Squeeze the limes to extract the juice. Pour the lime juice over the sliced scallops, ensuring they are completely submerged. The acid from the lime juice will “cook” the scallops by denaturing the proteins. Let them marinate for about 20-30 minutes, or until they turn opaque.
  4. Prepare the Vegetables:

    • While the scallops marinate, prepare the red onion, jalapeño peppers, cilantro, cherry tomatoes, and cucumber as instructed in the ingredients list.
  5. Drain and Rinse:

    • After the scallops have marinated, drain the lime juice from the bowl. Rinse the scallops under cold water to remove excess acidity.
  6. Combine Ingredients:

    • In a large mixing bowl, combine the drained scallops, diced red onion, chopped jalapeño peppers, cilantro, quartered cherry tomatoes, and diced cucumber. Gently toss to mix.
  7. Season the Ceviche:

    • Season the ceviche with salt and freshly ground black pepper. Adjust the seasoning to your taste.
  8. Add Olive Oil:

    • Drizzle extra-virgin olive oil over the ceviche and gently toss once more. The olive oil will add a touch of richness to the dish.
  9. Chill and Marinate:

    • Cover the ceviche bowl with plastic wrap and refrigerate for at least 30 minutes to allow the flavors to meld. You can also refrigerate it longer for a more intense flavor profile.
  10. Serve and Garnish:

    • When ready to serve, spoon the Hokkaido Scallop Ceviche into individual serving bowls or onto a large platter.
    • Garnish with slices of avocado, if desired, for a creamy contrast.
    • Serve the ceviche with tortilla chips or crackers on the side.
  11. Enjoy:

    • Dive into the refreshing and zesty Hokkaido Scallop Ceviche, savoring the delightful combination of flavors and the tender texture of the scallops.
  12. Storage:

    • Leftover ceviche can be stored in an airtight container in the refrigerator for up to one day. However, ceviche is best enjoyed fresh, so consume it promptly for the best taste and texture.

This Hokkaido Scallop Ceviche is a perfect appetizer for a seafood-loving crowd or a delightful addition to your next summer gathering. The citrusy tang, combined with the natural sweetness of Hokkaido scallops, creates a mouthwatering dish that’s both refreshing and satisfying. Enjoy!

Elevating Comfort Food: Wagyu Ground Beef Shepherd’s Pie

Wagyu Ground Beef Shepherd's Pie

Introduction

As the leaves begin to turn and the air carries a chill, it’s time to cozy up with a hearty dish that defines comfort: Wagyu Ground Beef Shepherd’s Pie. This classic fall recipe is elevated to new heights with the use of rich and flavorful Wagyu ground beef. In this blog post, we’ll guide you through creating this comforting dish that’s perfect for autumn gatherings.

Ingredients

For the Filling:

– 1 pound Wagyu ground beef
– 1 onion, finely chopped
– 2 carrots, diced
– 3 cloves garlic, minced
– 2 tablespoons tomato paste
– 1 cup beef broth
– 2 cups frozen peas
– 1 cup frozen corn
– 2 tablespoons all-purpose flour
– 2 tablespoons Worcestershire sauce
– Salt and pepper to taste

For the Mashed Potato Topping:

– 4 large potatoes, peeled and cubed
– 1/4 cup butter
– 1/4 cup milk
– Salt and pepper to taste

Instructions

Making the Filling:

1. In a large skillet, cook the Wagyu ground beef over medium heat until it’s browned and crumbled. Remove any excess fat.
2. Add the chopped onion, diced carrots, and minced garlic to the skillet. Sauté until the vegetables are tender.
3. Stir in the tomato paste and cook for an additional 2 minutes.
4. Sprinkle the flour over the meat and vegetable mixture. Stir well to combine.
5. Pour in the beef broth and Worcestershire sauce. Stir continuously until the mixture thickens.
6. Add the frozen peas and corn. Cook until they are heated through. Season with salt and pepper to taste.

Preparing the Mashed Potato Topping:

1. Place the peeled and cubed potatoes in a large pot of salted water. Bring to a boil and cook until the potatoes are tender.
2. Drain the potatoes and return them to the pot.
3. Mash the potatoes while adding butter and milk until you achieve a smooth and creamy consistency. Season with salt and pepper.

Assembling the Shepherd’s Pie:

1. Preheat your oven to 400°F (200°C).
2. Transfer the beef and vegetable mixture into a baking dish.
3. Carefully spread the mashed potatoes over the top, ensuring it covers the filling completely.
4. Use a fork to create decorative ridges on the surface of the mashed potatoes.
5. Place the dish in the preheated oven and bake for about 20 minutes or until the top is golden brown.
6. Serve your delicious Wagyu Ground Beef Shepherd’s Pie hot and enjoy the comforting flavors of fall.

Conclusion

Warm up this autumn with a dish that embodies the essence of comfort and flavor: Wagyu Ground Beef Shepherd’s Pie. The delectable combination of Wagyu beef, savory vegetables, and creamy mashed potatoes creates a hearty and satisfying meal that’s perfect for cool fall evenings. Elevate your comfort food game with this classic recipe made exceptional with the richness of Wagyu beef.

Make Dry Aged Wagyu at Home

Have you ever had Dry Aged Wagyu? Did you ever think you could make it at home? Dry aging is a culinary alchemy that transforms ordinary Wagyu beef into an extraordinary delicacy. By controlling temperature, humidity, and time, you can enhance the flavor, tenderness, and overall quality of your Wagyu. In this guide, we’ll walk you through the step-by-step process, describe the tantalizing results, and share tips for savoring your dry-aged Wagyu.

Dry aged Wagyu beef, often hailed as the epitome of culinary excellence, is a symphony of flavor, texture, and craftsmanship. This extraordinary meat undergoes a meticulous process that transforms it into a gastronomic masterpiece. The result is a steak experience like no other, with an unparalleled depth of flavor and tenderness that will leave you utterly mesmerized.

In this exploration of dry aged Wagyu, we will journey through the intricate steps of its creation, savor its remarkable flavor profile, and discover the art of savoring it to its fullest. Prepare to embark on a culinary voyage that showcases the sublime marriage of time, technique, and taste, culminating in a symphony of sensations on your palate.


1. Selecting the Wagyu Cut
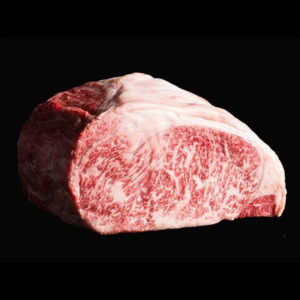
Start with a well-marbled cut of Wagyu, such as a ribeye or striploin. Quality matters, so source your Wagyu from a reputable supplier.

2. Preparing the Dry Aging Setup

  • Use a dedicated refrigerator with precise temperature control.
  • Set the temperature to 34°F (1°C) for safe aging.
  • Install a hygrometer to monitor humidity levels.
  • Maintain humidity at around 85% for optimal results.

3. Wrapping the Wagyu

  • If you do not have a dedicated dry age fridge you can wrap the Wagyu cut in a layer of cheesecloth or use a dry age bag to allow airflow.
  • Place it on a wire rack within the refrigerator.

4. Patience and Time
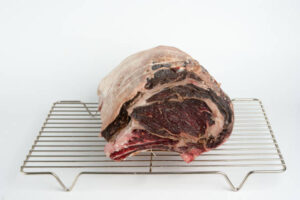
  • Dry age your Wagyu for a minimum of 21 days. Longer aging can intensify flavors.
  • Check the meat periodically but avoid opening the refrigerator too frequently to maintain humidity.
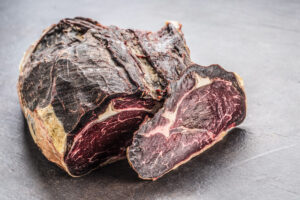
  • Dry aging A5 Japanese Wagyu steak over 21 days is a culinary journey that transforms a remarkable piece of meat into an even more extraordinary delicacy. Here’s a detailed account of how the steak looks and feels during this process:

Day 1-7: The Initial Stage

  • Appearance: When the steak starts with its usual fresh appearance. It’s bright red, with a good amount of marbling, showcasing the beautiful intramuscular fat.
  • Texture: The meat is soft and moist, as it’s just been cut from the whole piece.

Day 8-14: Beginning of Changes

  • Appearance: After about a week, you’ll notice some changes. The surface of the steak may become slightly darker as it starts to dry. There may be patches of white mold forming, which is perfectly normal.
  • Texture: The outer layer of the steak will begin to feel a bit firmer. However, the interior is still tender and moist.

Day 15-21: Maturation Continues

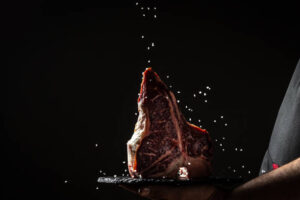
  • Appearance: Finally by the end of the third week, the steak’s surface has darkened significantly, taking on a dry, crusty appearance. The mold may have spread, and some parts of it might be trimmed away.
  • Texture: As the steak continues to lose moisture, the outer layer becomes considerably firmer. The marbling within the meat, however, is undergoing a significant transformation. The fat melts into the muscle fibers, enhancing both flavor and tenderness. The steak’s aroma intensifies, with hints of nuttiness and earthiness.

Overall Feel and Appearance:

    • The dry aged A5 Japanese Wagyu steak is a complex interplay of textures and flavors. The exterior is dry and firm, while the interior is incredibly tender, owing to the breakdown of connective tissues.
    • When the meat becomes more concentrated in flavor. It’s richer, with a unique umami depth that intensifies as the days go by.
    • When touched, the outer layer feels hard, almost like a protective crust. Inside, it remains supple and velvety.
5. Flavor Transformation

Dry aging A5 Japanese Wagyu is a culinary metamorphosis, an artful process that elevates this already exquisite beef to even greater heights of flavor and texture. As the beef ages, it undergoes a profound transformation, which results in a taste profile that is both captivating and unparalleled.

Initially, A5 Wagyu boasts a rich and buttery flavor with notes of umami, owing to its abundant marbling and high-fat content. But as it is dry aged, something magical happens. Since the aging process allows enzymes to work on the meat, breaking down muscle fibers and enhancing tenderness. Simultaneously, moisture is drawn out, concentrating the beef’s natural flavors.

This concentration of flavors takes A5 Wagyu to new heights. When the beefs flavor becomes more intense, the depth and complexity that tantalize the palate. This allows the umami notes to amplify, and you’ll detect hints of nuttiness, earthiness, and a subtle sweetness. Finally the texture evolves as well, with a buttery softness that melts in your mouth.

In essence, dry aging A5 Japanese Wagyu is a journey from richness to opulence. It’s a transformation that transcends the ordinary, resulting in a steak that’s a true masterpiece of flavor, a symphony of taste sensations that only dry aging can achieve.

6. Trim and Prepare

  1. Remove the Cheesecloth: Take the dry aged A5 Wagyu out of its packaging. It’s normal to find a dry, firm crust on the surface; this is part of the aging process.
  2. Assess the Meat: Inspect the beef to identify any hard, dried-out areas or any parts with excessive mold growth. While some mold is normal and part of the aging process, anything excessive or overly hard should be trimmed away.
  3. Start Trimming: Using the sharp boning knife, start trimming off the dry and hardened exterior. Be gentle, as the meat underneath is incredibly tender. Remove any visible mold and any parts that seem unpalatable.
  4. Trim the Edges: Trim the edges of the dry aged Wagyu to create even sides. This not only enhances presentation but also ensures even cooking.
  5. Cut into Portions: Decide on the portion size you want, whether it’s a single steak or smaller cuts for individual servings. Use your knife to cut through the meat gently. Wagyu is best enjoyed in moderate portions due to its richness.
  6. Pat Dry: After trimming and portioning, pat the meat with paper towels to remove any excess moisture. This helps achieve a better sear when cooking.

7. How to Best Enjoy Dry Aged Wagyu

  1. Minimal Seasoning: Dry aged Wagyu is a star on its own. Keep seasonings simple, using only salt and pepper to enhance the natural flavors.
  2. Precision Cooking: Sear the beef over high heat to achieve a crust, then finish it gently in the oven. This ensures the beef’s interior remains perfectly pink.
  3. Resting Time: Allow the cooked Wagyu to rest before slicing. This redistributes the juices, resulting in a juicier, more succulent steak.
  4. Cut Thin Slices: Serve the dry aged Wagyu in thin slices. Its richness is best appreciated in smaller portions.
  5. Pairing: Complement the beef’s richness with red wines like Cabernet Sauvignon or a full-bodied Malbec. A simple side salad or roasted vegetables can be ideal accompaniments.

Conclusion

Dry aged Wagyu is a culinary journey worth taking. With patience and precision, you can create a gourmet masterpiece that delights the palate. The rich, nutty flavors and melt-in-your-mouth tenderness make it a true delicacy for any steak lover.

Now that you’ve mastered the art of dry aging Wagyu, savor the fruits of your labor with a memorable meal that celebrates the incredible transformation this process bestows upon this exceptional beef. Enjoy!

Autumn Elegance: Lobster Bisque with Caviar

Lobster Bisque with Caviar

Introduction

As the autumn breeze ushers in cooler days, it’s the perfect time to savor the luxurious flavors of Lobster Bisque elevated with a touch of indulgence: caviar. This recipe blends the decadence of lobster with the rich, briny essence of caviar, creating a soup that’s perfect for autumn evenings. In this blog post, we’ll guide you through creating this sumptuous Lobster Bisque with Caviar, perfect for cozy gatherings and special occasions.

Ingredients

For the Lobster Bisque:

– 2 lobster tails, meat removed and chopped
– 2 tablespoons butter
– 1 onion, finely chopped
– 2 carrots, finely chopped
– 3 celery stalks, finely chopped
– 2 cloves garlic, minced
– 1/4 cup tomato paste
– 1/4 cup brandy
– 4 cups seafood stock
– 1 cup heavy cream
– 1 bay leaf
– Salt and pepper to taste

For the Caviar Garnish:

Quality caviar of your choice
– Fresh chives, finely chopped, for garnish

Instructions

Preparing the Lobster Bisque:

1. In a large soup pot, melt the butter over medium heat.
2. Add the finely chopped onion, carrots, and celery. Sauté until they begin to soften, about 5 minutes.
3. Stir in the minced garlic and cook for an additional minute.
4. Add the tomato paste and cook, stirring constantly, for about 2 minutes until it darkens slightly.
5. Deglaze the pot by adding the brandy. Allow it to simmer until it has almost evaporated.
6. Add the chopped lobster meat and sauté briefly, until it turns opaque.
7. Pour in the seafood stock, heavy cream, and add the bay leaf. Bring the mixture to a gentle simmer.
8. Let the bisque simmer for about 20 minutes, stirring occasionally, until it thickens and the flavors meld.
9. Season the bisque with salt and pepper to taste.

Garnishing with Caviar:

1. Once the bisque is ready, ladle it into serving bowls.
2. Carefully place a spoonful of quality caviar on top of each serving.
3. Garnish with a sprinkle of fresh chives.
4. Serve the Lobster Bisque with Caviar hot, alongside crusty bread for a truly elegant autumn meal.

Conclusion

Indulge in the elegance of autumn with a bowl of Lobster Bisque adorned with the opulence of caviar. This recipe combines the sweet, delicate flavor of lobster with the rich, briny burst of caviar, creating a symphony of tastes that’s sure to impress. Whether you’re hosting a special dinner or simply craving a taste of luxury, this Lobster Bisque with Caviar is the ideal choice for autumn gatherings. Savor the seasonal goodness and create unforgettable moments with this exquisite dish.

Spooky Squid Ink Lobster Sauce Pasta with Mushroom Skulls

Spooky Squid Ink Lobster Sauce Pasta with Mushroom Skulls: The Ultimate Halloween Treat

Halloween is just around the corner, and it’s time to get creative with your spooky culinary creations. If you’re looking for a Halloween treat that combines eerie aesthetics with delightful flavors, look no further than a Lobster Squid Ink Pasta and Mushroom Skulls. This dish is a perfect fusion of the macabre and the delicious, making it an ideal addition to your Halloween festivities.

The Perfect Halloween Treat

Squid Ink Pasta and Mushroom Skulls offer a unique and memorable Halloween dining experience. The contrast between the deep black pasta, the rich lobster sauce, and the eerie mushroom skulls creates a dish that’s both visually striking and incredibly flavorful. It’s a Halloween treat that combines the thrill of the spooky season with the joy of gourmet dining.

This Halloween, surprise your guests with a culinary masterpiece that’s both delicious and hauntingly beautiful. Squid Ink Pasta and Mushroom Skulls are sure to be the highlight of your Halloween celebration. Dare to indulge in this unforgettable treat that combines the best of both worlds: the thrill of Halloween and the pleasure of exceptional cuisine.

Spooky Squid Ink Pasta with Jumbo Lobster Tails and Mushroom Skulls Recipe

Ingredients:

Pasta

Mushroom Skulls

  • 8oz Whole white mushrooms
  • 2 tablespoons olive oil
  • Salt and pepper to taste

Creamy Lobster Sauce

  • 2 tablespoons butter
  • 2 cloves garlic, minced
  • 1 cup heavy cream
  • 1/2 cup chicken broth
  • 1/2 cup grated Parmesan cheese
  • Salt and pepper to taste
  • Fresh parsley, chopped (for garnish)

Instructions:

1. Prepare the Squid Ink Pasta:

  • Cook the squid ink spaghetti according to the package instructions until al dente. Drain and set aside.

2. Grill the Jumbo Lobster Tails:

  • Preheat your grill to medium-high heat.
  • Then brush the lobster tails with olive oil and season with salt and pepper.
  • Grill the lobster tails shell side down for about 5-6 minutes until the shells turn bright red and the meat is opaque.
  • Once you remove from the grill and let them cool slightly. Once cooled, remove the lobster meat from the shells and chop it into bite-sized pieces. Set aside.

3. Create the Mushroom Skulls:

  • Preheat your oven to 375°F (190°C).
  • First wash your mushrooms and pat dry
  • Next take a knife and carve our 2 eyes on the mushrooms and cut lines down the stem (do not cut all the way through)
  • Then brush the mushroom caps with olive oil and season with salt and pepper.
  • After place the mushrooms on a baking sheet, cap side down, and bake for about 15-20 minutes until tender.
  • Remove from the oven and let them cool.

4. Prepare the Creamy Lobster Sauce:

  • In a large skillet, melt the butter over medium heat. Add minced garlic and sauté for about 1 minute until fragrant.
  • Pour in the heavy cream and chicken broth. Bring to a simmer and cook for 2-3 minutes.
  • Stir in the grated Parmesan cheese until the sauce thickens. Season with salt and pepper to taste.
  • Add the chopped grilled lobster meat to the sauce and let it simmer for another 2-3 minutes until heated through.

5. Assemble Your Spooky Halloween Dish:

  • Toss the cooked squid ink spaghetti in the creamy lobster sauce until well coated.
  • Plate the pasta on serving dishes and top with the jumbo lobster tail pieces.
  • Next carefully place the mushroom skulls on top of the lobster tails.
  • Finally garnish with chopped fresh parsley for a pop of color.

6. Serve Your Spooky Delight:

  • Serve your Spooky Squid Ink Lobster Sauce Pasta with Mushroom Skulls to your Halloween party guests. Enjoy your eerie and delicious creation!

This Halloween dish combines the rich flavors of lobster and the unique touch of squid ink pasta, all while maintaining a spooky and fun presentation with the mushroom skulls. Happy Halloween feasting!


A Taste of Elegance: Baked Marinated Wine Lamb Racks

source

Lamb racks, when prepared with care and creativity, can transform an ordinary meal into an extraordinary dining experience. In this recipe blog, we’ll explore how to elevate your cooking game with a stunning dish: Baked Marinated Wine Lamb Racks. This recipe combines the bold flavors of a red wine marinade with the succulent tenderness of lamb for a truly unforgettable meal.

Ingredients:

  • 2 racks of lamb (approximately 1 1/2 to 2 pounds each)
  • 1 cup of red wine (choose a good quality red wine)
  • 4 cloves of garlic, minced
  • 2 tablespoons of fresh rosemary, finely chopped
  • 2 tablespoons of fresh thyme, finely chopped
  • 1/4 cup of olive oil
  • Salt and freshly ground black pepper to taste
  • 2 tablespoons of balsamic vinegar
  • 2 tablespoons of honey
  • 1/2 cup of chicken or vegetable broth
  • Fresh rosemary and thyme sprigs for garnish

Instructions:

1. Create the Wine Marinade:

  • In a mixing bowl, combine the red wine, minced garlic, chopped rosemary, chopped thyme, olive oil, balsamic vinegar, honey, salt, and black pepper. Mix thoroughly to create a rich marinade.

2. Marinate the Lamb:

  • Place the lamb racks in a large resealable plastic bag or a shallow dish.
  • Pour the wine marinade over the lamb, ensuring they are fully coated. Seal the bag or cover the dish with plastic wrap and refrigerate for at least 4 hours or overnight. The longer you marinate, the more flavorful the lamb will be.

3. Preheat the Oven:

  • Preheat your oven to 375°F (190°C) while the lamb is marinating. This will allow it to come to room temperature.

4. Prepare the Baking Dish:

  • Take the lamb out of the refrigerator and let it sit at room temperature for about 30 minutes.
  • Meanwhile, select a baking dish large enough to accommodate both racks comfortably. You can also use an oven-safe skillet.

5. Sear the Lamb:

  • Heat a skillet or ovenproof pan over medium-high heat. Once hot, remove the lamb racks from the marinade and sear them for 2-3 minutes on each side until they develop a golden-brown crust. This step locks in flavor and creates a beautiful texture.

6. Bake the Lamb:

  • Transfer the seared lamb racks to the prepared baking dish or skillet. Pour the marinade over the lamb.
  • Add the chicken or vegetable broth to the pan. This will create a flavorful sauce as the lamb bakes.
  • Place the dish in the preheated oven and bake for approximately 20-25 minutes for medium-rare (adjust the time for your preferred doneness).

7. Rest and Garnish:

  • Remove the lamb from the oven and cover it loosely with aluminum foil. Let it rest for about 10 minutes. This allows the juices to redistribute, ensuring a juicy and tender result.
  • Before serving, garnish the lamb with fresh rosemary and thyme sprigs for a touch of elegance.

8. Slice and Serve:

  • After resting, slice the lamb racks into individual chops and arrange them on a serving platter.
  • Drizzle the delicious wine-infused sauce from the baking dish over the lamb for an added burst of flavor.

Baked Marinated Wine Lamb Racks are a culinary masterpiece that combines the richness of red wine with the tenderness of lamb. This dish is perfect for special occasions when you want to impress your guests with an elegant and flavorful meal. Enjoy the taste of sophistication in every bite!

Luxurious Lobster Eggs Benedict with Caviar

Lobster Eggs Benedict with Caviar

Introduction:

Prepare to indulge in the epitome of gourmet brunch with our Lobster Eggs Benedict recipe, a harmonious fusion of succulent lobster, perfectly poached eggs, and the lavish touch of Kaluga caviar. This dish is a celebration of luxurious flavors that will elevate your culinary experience.

Ingredients:

– 2 lobster tails, cooked and meat removed
– 4 English muffins, halved and toasted
– 4 poached eggs
– 1 cup hollandaise sauce
– Fresh chives, finely chopped, for garnish
Kaluga caviar, for topping
– Salt and freshly ground black pepper, to taste

Preparing the Lobster

1. Carefully remove the lobster meat from the tails, ensuring to discard any shells or cartilage. Chop the lobster into bite-sized pieces.

Poaching the Eggs

1. Fill a saucepan with water and bring it to a gentle simmer. Add a splash of vinegar to help coagulate the egg whites.
2. Crack an egg into a small bowl. Create a gentle whirlpool in the simmering water and slide the egg into the center.
3. Allow the egg to poach for about 3-4 minutes, until the whites are set but the yolk remains runny. Remove with a slotted spoon.

Assembling the Dish

1. Place the toasted English muffin halves on serving plates.
2. Arrange the chopped lobster meat on top of each muffin half.
3. Gently place a poached egg on top of the lobster.

Drizzling with Hollandaise

1. Generously drizzle hollandaise sauce over each poached egg and lobster stack, ensuring they are well-covered.
2. Season with salt and freshly ground black pepper to taste.

Adding the Finishing Touch

1. Crown the eggs Benedict with a spoonful of Kaluga caviar, adding a touch of elegance and decadence.
2. Sprinkle finely chopped fresh chives over the dish for a burst of color and flavor.

Savoring the Luxury

1. Each forkful of our Lobster Eggs Benedict with Kaluga caviar offers an exquisite blend of textures and tastes.
2. The tender lobster, perfectly poached eggs, rich hollandaise, and the luxurious caviar create a symphony of flavors.

Conclusion:

Experience the pinnacle of brunch sophistication with our Lobster Eggs Benedict recipe, where succulent lobster meets the opulence of Kaluga caviar. This dish is an indulgent treat that combines the finest ingredients for a brunch experience that’s both luxurious and unforgettable.

Seared Ahi Tuna Recipe with Zesty Citrus Soy Glaze

There’s something magical about the way that Seared Ahi Tuna Recipe with Zesty Citrus Soy Glaze can create unforgettable dining experiences. One such extraordinary pairing is Seared Ahi Tuna with Wagyu Tallow. The rich, succulent flavor of Wagyu tallow, combined with the delicate and buttery ahi tuna, makes for a dish that tantalizes the taste buds like no other. In this blog post, we’ll dive into the art of crafting this indulgent masterpiece and explore the nuances that make it truly exceptional.

The Perfect Ingredients:

In order to create the Seared Ahi Tuna with Wagyu Tallow, you’ll need the finest components. Begin by acquiring sashimi-grade ahi tuna, ideally sourced from a reputable provider like Kai Wagyu. This ensures the tuna’s utmost freshness and quality. Alongside the ahi tuna, Wagyu tallow and sesame seed oil will play pivotal roles in elevating the dish’s flavors.

Unveiling the Wagyu Tallow:

Wagyu tallow is the secret ingredient that imparts a depth of flavor you won’t find with any other cooking oil. From the prized fat of Wagyu cattle, this tallow has a lower melting point compared to conventional fats, resulting in a luxurious mouthfeel and an intensified savory taste. There are two options: you can purchase premade Wagyu tallow or create your own by rendering the fat from Wagyu trimmings. Either way, its incorporation is the key to a truly remarkable dish.

Pairing Wagyu Tallow & Ahi Tuna:

To elevate the Seared Ahi Tuna with Wagyu Tallow, consider adding complementary components to your dish. Sesame seed dressing, sweet Hawaiian-inspired dressings, and miso dressing can amplify the flavors and provide a delightful contrast to the richness of the tuna and tallow.

As for accompaniments, consider serving the seared tuna on a bed of rice, topped with creamy avocado, crabmeat tossed in mayo, crispy wonton chips, refreshing cucumber, onion, and daikon. This fusion of textures and flavors creates a harmonious balance that enriches the overall experience.

Elevating the Presentation:

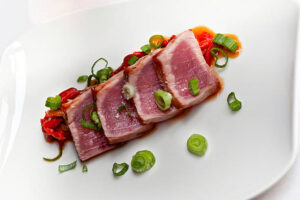
Culinary artistry extends beyond taste to presentation. Stack your Seared Ahi Tuna with Wagyu Tallow using a round cutter for an eye-catching presentation that makes a statement on your plate. Further enhance the visual appeal with carefully chosen garnishes like picked daikon, vibrant green onions, and toasted sesame seeds.

Personal Touch 

For me, Seared Ahi Tuna has been a lifelong culinary journey. From its exquisite flavors in Japan to its ocean-inspired taste in Mexico, the dish carries with it memories and experiences from around the world. Crafting this dish at home brings these flavors to your table, allowing you to create your own moments of culinary joy.

Seared Ahi Tuna with Wagyu Tallow is not just a recipe; it’s an exploration of flavors, a celebration of quality ingredients, and a journey into the heart of culinary passion. Whether you’re a seasoned chef or a culinary enthusiast, this dish is an invitation to savor the marriage of ahi tuna’s purity and Wagyu tallow’s opulence.

Seared Ahi Tuna Recipe with Zesty Citrus Soy Glaze Recipe

Seared Ahi Tuna

Ingredients:

Instructions:

For the Seared Ahi Tuna:

  1. Pat the ahi tuna dry and season with salt and pepper.
  2. Heat Wagyu tallow in a pan over high heat.
  3. Sear the tuna for 1-2 minutes on each side for a rare center.
  4. Remove from heat and set aside.

Citrus Soy Glaze

Ingredients:

  • 1/4 cup soy sauce
  • 2 tablespoons fresh orange juice (or lemon juice)
  • 1 tablespoon honey
  • 1 teaspoon grated fresh ginger
  • 1 garlic clove, minced
  • 1/2 teaspoon sesame oil
  • 1/2 teaspoon red pepper flakes (adjust to taste)
  • 1 green onion, thinly sliced (for garnish)

Instructions:

  1. First, in a small saucepan, whisk together the soy sauce, fresh orange juice (or lemon juice), and honey. The sweet-tart combination of citrus and honey will form the base of your glaze.
  2. Then stir in the freshly grated ginger and minced garlic. These aromatic ingredients will infuse the glaze with a delightful depth of flavor.
  3. For a subtle complexity, drizzle in the sesame oil. The nutty aroma will enhance the overall richness of the glaze.
  4. Sprinkle in the red pepper flakes to add a gentle kick of heat. Adjust the amount based on your personal spice preference.
  5. Place the saucepan over medium heat. Allow the mixture to simmer gently, stirring occasionally. The glaze will start to reduce and thicken. This should take about 5-7 minutes.
  6. Once the glaze has reached your desired consistency, taste it and adjust the flavors as needed. You can add a touch more honey for sweetness, more citrus for tang, or more red pepper flakes for extra heat.
  7. Finally remove the saucepan from the heat and let the glaze cool slightly. As it cools, it will thicken a bit more. When serving, garnish with thinly sliced green onion for a fresh finishing touch.

Plating Instructions:

  1. Begin by selecting your plating surface, whether it’s a white plate, a wooden board, or a sleek slate. A clean and uncluttered background will allow the vibrant colors of the dish to shine.
  2. Then place a small amount of the Zesty Citrus Soy Glaze onto the center of the plate. Use the back of a spoon to spread it out slightly, creating a base for the ahi tuna.
  3. Gently place your perfectly seared ahi tuna on top of the glaze. Consider angling the tuna slightly to add visual interest and dynamism to the plate.
  4. Using a small ladle or a spoon, drizzle a generous amount of the Zesty Citrus Soy Glaze over the seared ahi tuna. Allow the glaze to cascade gracefully down the sides of the tuna and pool on the plate.
  5. Add a pop of color and freshness by artfully arranging microgreens, edible flowers, or thinly sliced green onions around the edges of the plate. These garnishes provide a pleasing contrast and contribute to the dish’s overall visual appeal.
  6. For a delightful texture contrast, sprinkle a pinch of sesame seeds over the top of the tuna and the glaze. These little seeds add a touch of elegance and a hint of crunch.
  7. Leave a bit of negative space on the plate to let the beauty of the dish stand out. This open area creates balance and prevents the plate from feeling overcrowded.
  8. Before presenting your creation, take a moment to assess the plate’s composition. In order to ensure that the glaze drizzle is balanced, the garnishes are well-placed, and every element looks intentional and harmonious.
  9. When you’re sharing your culinary masterpiece on social media, capture a few well-lit photos from different angles. Combining these colors, textures, and flavors is a visual feast in itself.
  10. Finally present your Seared Ahi Tuna with Zesty Citrus Soy Glaze to your eager guests. The stunning plating is sure to heighten their anticipation, and the flavors will exceed their expectations.