
There’s something magical about the way that Seared Ahi Tuna Recipe with Zesty Citrus Soy Glaze can create unforgettable dining experiences. One such extraordinary pairing is Seared Ahi Tuna with Wagyu Tallow. The rich, succulent flavor of Wagyu tallow, combined with the delicate and buttery ahi tuna, makes for a dish that tantalizes the taste buds like no other. In this blog post, we’ll dive into the art of crafting this indulgent masterpiece and explore the nuances that make it truly exceptional.
The Perfect Ingredients:
In order to create the Seared Ahi Tuna with Wagyu Tallow, you’ll need the finest components. Begin by acquiring sashimi-grade ahi tuna, ideally sourced from a reputable provider like Kai Wagyu. This ensures the tuna’s utmost freshness and quality. Alongside the ahi tuna, Wagyu tallow and sesame seed oil will play pivotal roles in elevating the dish’s flavors.
Unveiling the Wagyu Tallow:
Wagyu tallow is the secret ingredient that imparts a depth of flavor you won’t find with any other cooking oil. From the prized fat of Wagyu cattle, this tallow has a lower melting point compared to conventional fats, resulting in a luxurious mouthfeel and an intensified savory taste. There are two options: you can purchase premade Wagyu tallow or create your own by rendering the fat from Wagyu trimmings. Either way, its incorporation is the key to a truly remarkable dish.
Pairing Wagyu Tallow & Ahi Tuna:
To elevate the Seared Ahi Tuna with Wagyu Tallow, consider adding complementary components to your dish. Sesame seed dressing, sweet Hawaiian-inspired dressings, and miso dressing can amplify the flavors and provide a delightful contrast to the richness of the tuna and tallow.
As for accompaniments, consider serving the seared tuna on a bed of rice, topped with creamy avocado, crabmeat tossed in mayo, crispy wonton chips, refreshing cucumber, onion, and daikon. This fusion of textures and flavors creates a harmonious balance that enriches the overall experience.
Elevating the Presentation:
Culinary artistry extends beyond taste to presentation. Stack your Seared Ahi Tuna with Wagyu Tallow using a round cutter for an eye-catching presentation that makes a statement on your plate. Further enhance the visual appeal with carefully chosen garnishes like picked daikon, vibrant green onions, and toasted sesame seeds.
Personal Touch
For me, Seared Ahi Tuna has been a lifelong culinary journey. From its exquisite flavors in Japan to its ocean-inspired taste in Mexico, the dish carries with it memories and experiences from around the world. Crafting this dish at home brings these flavors to your table, allowing you to create your own moments of culinary joy.
Seared Ahi Tuna with Wagyu Tallow is not just a recipe; it’s an exploration of flavors, a celebration of quality ingredients, and a journey into the heart of culinary passion. Whether you’re a seasoned chef or a culinary enthusiast, this dish is an invitation to savor the marriage of ahi tuna’s purity and Wagyu tallow’s opulence.
Seared Ahi Tuna Recipe with Zesty Citrus Soy Glaze Recipe
Seared Ahi Tun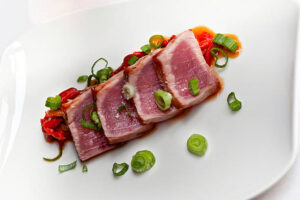 a
a

Ingredients:
- 2 – 8oz sashimi-grade ahi tuna filets
- Salt and pepper to taste
- 2 tbsp Wagyu tallow
Instructions:
For the Seared Ahi Tuna:
- Pat the ahi tuna dry and season with salt and pepper.
- Heat Wagyu tallow in a pan over high heat.
- Sear the tuna for 1-2 minutes on each side for a rare center.
- Remove from heat and set aside.
Citrus Soy Glaze

Ingredients:
- 1/4 cup soy sauce
- 2 tablespoons fresh orange juice (or lemon juice)
- 1 tablespoon honey
- 1 teaspoon grated fresh ginger
- 1 garlic clove, minced
- 1/2 teaspoon sesame oil
- 1/2 teaspoon red pepper flakes (adjust to taste)
- 1 green onion, thinly sliced (for garnish)
Instructions:
- First, in a small saucepan, whisk together the soy sauce, fresh orange juice (or lemon juice), and honey. The sweet-tart combination of citrus and honey will form the base of your glaze.
- Then stir in the freshly grated ginger and minced garlic. These aromatic ingredients will infuse the glaze with a delightful depth of flavor.
- For a subtle complexity, drizzle in the sesame oil. The nutty aroma will enhance the overall richness of the glaze.
- Sprinkle in the red pepper flakes to add a gentle kick of heat. Adjust the amount based on your personal spice preference.
- Place the saucepan over medium heat. Allow the mixture to simmer gently, stirring occasionally. The glaze will start to reduce and thicken. This should take about 5-7 minutes.
- Once the glaze has reached your desired consistency, taste it and adjust the flavors as needed. You can add a touch more honey for sweetness, more citrus for tang, or more red pepper flakes for extra heat.
- Finally remove the saucepan from the heat and let the glaze cool slightly. As it cools, it will thicken a bit more. When serving, garnish with thinly sliced green onion for a fresh finishing touch.
Plating Instructions:
- Begin by selecting your plating surface, whether it’s a white plate, a wooden board, or a sleek slate. A clean and uncluttered background will allow the vibrant colors of the dish to shine.
- Then place a small amount of the Zesty Citrus Soy Glaze onto the center of the plate. Use the back of a spoon to spread it out slightly, creating a base for the ahi tuna.
- Gently place your perfectly seared ahi tuna on top of the glaze. Consider angling the tuna slightly to add visual interest and dynamism to the plate.
- Using a small ladle or a spoon, drizzle a generous amount of the Zesty Citrus Soy Glaze over the seared ahi tuna. Allow the glaze to cascade gracefully down the sides of the tuna and pool on the plate.
- Add a pop of color and freshness by artfully arranging microgreens, edible flowers, or thinly sliced green onions around the edges of the plate. These garnishes provide a pleasing contrast and contribute to the dish’s overall visual appeal.
- For a delightful texture contrast, sprinkle a pinch of sesame seeds over the top of the tuna and the glaze. These little seeds add a touch of elegance and a hint of crunch.
- Leave a bit of negative space on the plate to let the beauty of the dish stand out. This open area creates balance and prevents the plate from feeling overcrowded.
- Before presenting your creation, take a moment to assess the plate’s composition. In order to ensure that the glaze drizzle is balanced, the garnishes are well-placed, and every element looks intentional and harmonious.
- When you’re sharing your culinary masterpiece on social media, capture a few well-lit photos from different angles. Combining these colors, textures, and flavors is a visual feast in itself.
- Finally present your Seared Ahi Tuna with Zesty Citrus Soy Glaze to your eager guests. The stunning plating is sure to heighten their anticipation, and the flavors will exceed their expectations.


